[사물 인터넷 네트워크와 서비스 구축 강좌] #3-8 센서장치간 BLE 통신
강좌 전체보기
.
이번 파트에서는 센서장치간 BLE 통신을 구현해 보겠습니다.
즉, 2대의 센서장치가 서로를 찾아서 연결한 뒤 데이터를 주고받는 방법입니다. 이 방법을 잘 응용하면 상황에 따라 센서장치끼리 데이터를 주고 받는, 스마트한 센서장치와 네트웍을 만들 수 있습니다.
이번 파트의 예제에서는 2대의 센서장치가 연결되면 서로 채팅 메시지를 주고 받을 수 있도록 구현해 보겠습니다.
센서장치간 BLE 통신 테스트
이미 [3-7. 센서장치-모바일 BLE 통신] 파트의 예제에서 BLE peripheral / GATT server 역할을 하는 센서장치를 만들었습니다. 따라서 BLE central / GATT client 역할을 하는 센서장치를 하나 추가만 하면 테스트가 가능하겠죠. 모바일 장치처럼 주변 BLE 기기를 스캔하고, 원하는 기기를 찾아 능동적으로 BLE 연결 – 데이터 통신을 수행하는 기기를 만들어야 합니다.
3-7 파트에서 이미 사용했던 ESP32 모듈을 PC에 연결하고, 새로운 ESP32 모듈을 하나 더 준비합니다. 새로 추가하는 ESP32 모듈이 아두이노 개발환경의 시리얼 모니터를 통해 연결될 예정이기 때문에 기존 ESP32 모듈은 다른 방법으로 PC에서 데이터를 주고 받을 수 있어야 합니다.
SerialPortMon 프로그램을 사용하면 됩니다. 아래 링크에서 프로그램 받아 실행하세요.
3-7 파트에서 미리 만들어 둔 ESP32 모듈의 포트를 확인하고, SerialPortMon 프로그램에서 해당 포트로 연결하세요. 그럼 아래처럼 ESP32 가 시리얼 통신으로 보내준 메시지를 받아볼 수 있습니다. 또한, 메시지를 ESP32 모듈로 보낼 수도 있습니다.
이제 새로 준비해 둔 ESP32 모듈에 GATT client 로 동작하는 스케치를 올려보겠습니다. 아두이노 개발환경을 실행하고, ESP32 모듈을 연결하고, 아래 링크에서 스케치를 받아 업로드 해주세요. (PC에 두 개의 ESP32 모듈이 연결되어 있습니다. 포트를 잘못 선택하지 않도록 주의하세요.)
업로드 한 스케치는 특정 UUID 를 가진 iBeacon 장치를 찾도록 되어있습니다. 스케치에서 아래 코드입니다.
- #define BEACON_UUID “4d6fc88bbe756698da486866a36ec78e“
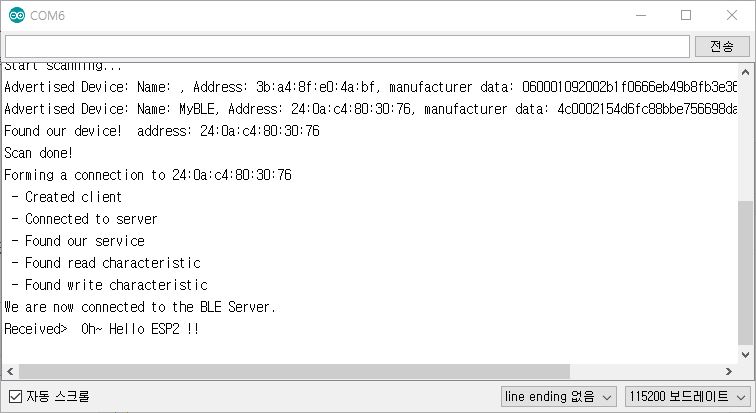
만약 BLE 스캔 중 UUID 가 일치하는 장치를 찾으면 이 장치에 BLE 연결을 해서 채팅할 준비를 합니다. 채팅 준비를 한다는 말은, 메시지를 보낼 때 사용할 write 속성을 가진 characteristic 을 찾습니다. 메시지를 받기 위해 read, notify 속성이 설정된 characteristic 을 찾습니다. 그리고 notify 기능을 on 해줍니다.
스케치 업로드가 끝나면 [시리얼 모니터]를 실행하고 출력되는 메시지를 확인하세요. 그리고 연결이 되면 채팅을 시도해보세요. 시리얼 모니터에서 전달한 메시지가 SerialPortMon 에서 보여야 하고, 반대로 SerialPortMon 에서 보낸 메시지도 아두이노 시리얼 모니터에 보여야 합니다.
이제 두 장치가 서로 채팅 메시지를 주고 받을 수 있습니다!!!
GATT client 코드 분석
이번 파트에서 새로 준비한 ESP32 모듈에 올린 소스코드를 살펴보겠습니다. 소스 파일 상단에는 아래처럼 UUID 를 미리 선언해 둔 부분이 있습니다.
// The remote service we wish to connect to.
#define BEACON_UUID "4d6fc88bbe756698da486866a36ec78e"
static BLEUUID serviceUUID("4fafc201-1fb5-459e-8fcc-c5c9c331914b");
// The characteristic of the remote service we are interested in.
static BLEUUID readCharUUID("beb5483e-36e1-4688-b7f5-ea07361b26fa");
static BLEUUID writeCharUUID("beb5483e-36e1-4688-b7f5-ea07361b26a8");
총 4개의 UUID 값을 미리 기억하고 있어야 하기 때문에 선언해둔 것입니다.
- BEACON_UUID : 우리가 연결할 장치를 찾기 위해 iBeacon UUID 를 기억해 둡니다.
- serviceUUID : BLE 장치에 연결한 뒤, 채팅 서비스를 찾기 위해 service UUID 값을 기록해 뒀습니다.
- readCharUUID : 메시지를 읽어올 때 사용할 characteristic UUID 입니다. 실제 주기적으로 메시지를 읽어오는 동작을 하는 대신 notify 기능을 사용해서 메시지가 있을때마다 통보해 달라고 요청할 것입니다. 그래서 이 characteristic 은 notify 기능을 활성화 할 때 사용합니다.
- writeCharUUID : 메시지를 상대방에게 보낼 때 사용하는 characteristic UUID 입니다.
이제 아두이노의 초기화 함수, 메인 함수인 setup(), loop() 함수를 통해 GATT client 장치가 어떻게 동작하는지 살펴보겠습니다.
먼저 setup() 함수와 여기서 실행되는 코드들부터 보겠습니다.
void setup() {
  ......
  initBle();
  scanInit();
  scan();
}

void initBle() {
  // Create the BLE Device
  BLEDevice::init("MyBLE");
}

void scanInit() {
  pBLEScan = BLEDevice::getScan(); //create new scan
  pBLEScan->setAdvertisedDeviceCallbacks(new MyAdvertisedDeviceCallbacks());
  pBLEScan->setActiveScan(true);            //active scan uses more power, but get results faster
}

void scan() {
  Serial.println("Start scanning...");
  pBLEScan->start(scanTime);    // (Blocking call)
  Serial.println("Scan done!");
}
GATT client 장치는 연결된 장치의 service 를 사용하고 통신을 제어할 뿐, 자신이 service-characteristic 구조를 제공해 줄 필요는 없습니다. 그래서 service-characteristic 제공을 위한 설정 코드가 없습니다. setup() 내부에서의 코드 진행 과정을 보면…
- BLE 장치 초기화를 합니다.
- BLEScan 인스턴스를 얻고 콜백함수를 등록합니다.
- 스캔을 실행합니다.
BLE 스캔이 실행되면 BLE 장치가 발견될 때마다 콜백 함수가 호출될 것입니다. 아래 코드가 호출됩니다.
class MyAdvertisedDeviceCallbacks: public BLEAdvertisedDeviceCallbacks {
    void onResult(BLEAdvertisedDevice advertisedDevice) {
      Serial.printf("Advertised Device: %s \n", advertisedDevice.toString().c_str());

      // Check beacon UUID (BEACON_UUID)
      if(advertisedDevice.haveManufacturerData()) {
        std::stringstream ss;
        char *pHex = BLEUtils::buildHexData(nullptr,
                                            (uint8_t*)advertisedDevice.getManufacturerData().data(),
                                            advertisedDevice.getManufacturerData().length());
        ss << ", manufacturer data: " << pHex;
        free(pHex);
        std::string m_data = ss.str();

        if (m_data.find(m_targetUUID) != std::string::npos) {
          Serial.print("Found our device!  address: ");
          Serial.println(advertisedDevice.getAddress().toString().c_str());
          advertisedDevice.getScan()->stop();
          pServerAddress = new BLEAddress(advertisedDevice.getAddress());
          doConnect = true;
        }
      }
    }
};
스캔 콜백 함수가 호출될 때 Advertising packet – Manufacturer data 에서 우리가 찾는 UUID 가 포함되어 있는지 검사합니다. 만약 UUID 가 발견된다면 우리가 찾는 장치가 주변에 있다는 얘기죠!
그럼 스캔을 멈추고 BLEAddress 인스턴스를 생성하도록 합니다. BLE 연결 과정은 이후 loop() 에서 처리해줍니다.
메인 반복 함수인 loop() 의 코드는 아래와 같습니다.
void loop() {
  // If the flag "doConnect" is true then we have scanned for and found the desired
  // BLE Server with which we wish to connect.  Now we connect to it.  Once we are
  // connected we set the connected flag to be true.
  if (doConnect == true) {
    if (connectToServer(*pServerAddress)) {
      Serial.println("We are now connected to the BLE Server.");
      connected = true;
    } else {
      Serial.println("We have failed to connect to the server; there is nothin more we will do.");
      connected = false;
    }
    doConnect = false;
  }

  if(connected && (pClient->isConnected() == false)) {
    connected = false;
    Serial.println("Disconnected!! Reset after 5sec.");
    esp_deep_sleep(1000000LL * GPIO_DEEP_SLEEP_DURATION);
  }

  if(!connected) {
    scan();
  }

  // If we are connected to a peer BLE Server, update the characteristic each time we are reached
  // with the current time since boot.
  if (connected) {
    int input_max = 20;
    char input_char[] = {0x00, 0x00, 0x00, 0x00, 0x00,
                            0x00, 0x00, 0x00, 0x00, 0x00,
                            0x00, 0x00, 0x00, 0x00, 0x00,
                            0x00, 0x00, 0x00, 0x00, 0x00};
    int i=0;
    while(Serial.available()) {
      char input = Serial.read();
      input_char[i] = input;
      i++;
      if(i >= input_max) break;
    }

    if(i > 0) {
      // Set the characteristic's value to be the array of bytes that is actually a string.
      pWriteCharacteristic->writeValue((uint8_t*)input_char, i);
    }
  }

  delay(3000); // Delay a second between loops.
}
if 조건문을 기준으로 4개의 블럭으로 나눌 수 있습니다.
- if (doConnect == true) {}
- setup() 에서 실행한 스캔 과정 중 우리가 원하는 BLE 장치를 발견했다면 여기서 연결을 시도합니다. connectToServer() 함수가 호출됩니다.
- if(connected && (pClient->isConnected() == false)) {}
- BLE 연결이 해제되었을 때, 여기서 감지해서 모듈을 리셋 합니다. 그럼 스캔과정부터 다시 실행 될 것입니다.
- if(!connected) {}
- 주변에 원하는 BLE 장치가 없을 경우 계속 scan() 을 시도합니다.
- if (connected) {}
- BLE 연결이 된 상태라면, PC 에서 시리얼 통신으로 데이터 들어온게 있는지 여기서 확인합니다. 그 중 20 byte 를 떼어내서 연결된 장치에게 보내줍니다. 데이터를 보낼때는 write 속성이 있는 characteristic 에 값을 써줘야겠죠. 이 작업을 하는 것이 아래 코드입니다.
- pWriteCharacteristic->writeValue((uint8_t*)input_char, i);
마지막으로 스캔으로 원하는 BLE 장치가 발견되었을 때 연결을 시도하는 connectToServer() 함수를 보겠습니다.
bool connectToServer(BLEAddress pAddress) {
    Serial.print("Forming a connection to ");
    Serial.println(pAddress.toString().c_str());

    pClient = BLEDevice::createClient();
    Serial.println(" - Created client");

    // Connect to the remove BLE Server. (Blocking call)
    pClient->connect(pAddress);
    if(pClient->isConnected() == false) {
      return false;
    }
    Serial.println(" - Connected to server");

    // Obtain a reference to the service we are after in the remote BLE server.
    pRemoteService = pClient->getService(serviceUUID);
    if (pRemoteService == nullptr) {
      Serial.print("Failed to find our service UUID: ");
      Serial.println(serviceUUID.toString().c_str());
      return false;
    }
    Serial.println(" - Found our service");

    // Obtain a reference to the characteristic in the service of the remote BLE server.
    pReadCharacteristic = pRemoteService->getCharacteristic(readCharUUID);
    if (pReadCharacteristic == nullptr) {
      Serial.print("Failed to find read characteristic UUID: ");
      Serial.println(readCharUUID.toString().c_str());
      return false;
    }
    Serial.println(" - Found read characteristic");
    pReadCharacteristic->registerForNotify(notifyCallback);
    const uint8_t v[]={0x1,0x0};
    pReadCharacteristic->getDescriptor(BLEUUID((uint16_t)0x2902))->writeValue((uint8_t*)v,2,true);

    pWriteCharacteristic = pRemoteService->getCharacteristic(writeCharUUID);
    if (pWriteCharacteristic == nullptr) {
      Serial.print("Failed to find write characteristic UUID: ");
      Serial.println(writeCharUUID.toString().c_str());
      return false;
    }
    Serial.println(" - Found write characteristic");
}
GATT client 로 동작해야 하기 때문에 먼저 BLEClient 인스턴스를 생성합니다. 그리고 스캔할 때 얻은 BLEAddress 를 이용해 접속을 시도합니다.
pClient = BLEDevice::createClient();
pClient->connect(pAddress);
여기서 pClient->connect() 함수 호출은 Blocking call 입니다. 연결이 완료 될때까지 코드실행이 여기서 멈춘다는 의미입니다. 그래서 connect() 아래의 코드는 연결 완료/실패가 판정된 후라고 보면됩니다.
연결이 정상적으로 되었다면 Service Discovery 작업까지 완료된 상태입니다. 따라서 원하는 Service(채팅 Service)가 있는지 확인할 수 있습니다.
    // Obtain a reference to the service we are after in the remote BLE server.
    pRemoteService = pClient->getService(serviceUUID);
    if (pRemoteService == nullptr) {
      Serial.print("Failed to find our service UUID: ");
      Serial.println(serviceUUID.toString().c_str());
      return false;
    }
    Serial.println(" - Found our service");
메시지를 받기 위해 사용할, read/notify 속성이 있는 characteristic 을 찾습니다. 그리고 notify 기능을 활성화 합니다. 이때 notify 메시지가 왔을 때 실행할 콜백 함수도 등록합니다.
    // Obtain a reference to the characteristic in the service of the remote BLE server.
    pReadCharacteristic = pRemoteService->getCharacteristic(readCharUUID);
    if (pReadCharacteristic == nullptr) {
      Serial.print("Failed to find read characteristic UUID: ");
      Serial.println(readCharUUID.toString().c_str());
      return false;
    }
    Serial.println(" - Found read characteristic");
    pReadCharacteristic->registerForNotify(notifyCallback);
    const uint8_t v[]={0x1,0x0};
    pReadCharacteristic->getDescriptor(BLEUUID((uint16_t)0x2902))->writeValue((uint8_t*)v,2,true);
메시지를 보낼 때 사용할, write 속성이 있는 characteristic 을 찾습니다.
    pWriteCharacteristic = pRemoteService->getCharacteristic(writeCharUUID);
    if (pWriteCharacteristic == nullptr) {
      Serial.print("Failed to find write characteristic UUID: ");
      Serial.println(writeCharUUID.toString().c_str());
      return false;
    }
    Serial.println(" - Found write characteristic");
이러면 코드상으로 채팅할 준비가 모두 끝이납니다. 이제부터는 자유롭게 데이터가 오갈 수 있습니다.
활용
센서장치가 모바일 폰과 BLE 통신으로 연결되는 시나리오가 가장 기본이란 사실은 변함이 없습니다.
하지만 여러개의 센서장치가 서로 데이터를 주고 받기 위해 모바일 폰에 항상 접속을 시도한다면, 모바일 폰은 얼마나 피곤하겠습니까. 주변의 상황을 잘 파악해서 자동으로 BLE 연결, 데이터 통신을 시도하는 센서장치라면, 그 자체만으로도 사람들에게 어필할 수 있는, 충분히 매력적인 센서장치가 될 것입니다.
주의!!! [사물 인터넷 네트워크와 서비스 구축 강좌] 시리즈 관련 문서들은 무단으로 내용의 일부 또는 전체를 게시하여서는 안됩니다. 계속 내용이 업데이트 되는 문서이며, 문서에 인용된 자료의 경우 원작자의 라이센스 문제가 있을 수 있습니다.
강좌 전체보기
.


