Wireless charging mouse DIY (Eng)
The introduction
I prefer wired mouse to wireless mouse for one reason, which is about battery. It feels inconvenient for me to look for the charging machine to charge up a dead battery or purchase new battery when it is discharged. Sometimes it goes bad at inconvenient times.
I found wireless mouse not used for sometime in my room and decided to develop automated charging wireless mouse for myself
First, you can purchase the inductive charging set online.(follow this link) With this module, you can upgrade your wireless mouse into your own automated charging wireless mouse.

The Methodology
When it comes to the wireless mouse with 3V (uses two 1.5V batteries), the inductive charging receiver makes 5V DC output and it flows into LiPo charger module. LiPo charger module charges LiPo battery and prevent over-charging (and over-discharging). Also we can draw power from LiPo charger module to activate the mouse.
Gather the components
the components and tools for this job:
- wireless mouse
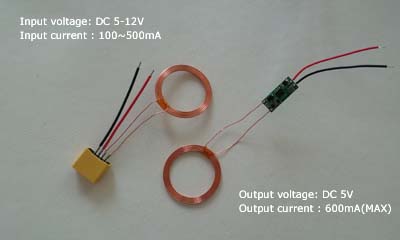
- inductive charging set (input 5~12V, output 5V)
- LiPo charging module
- LiPo battery
- power source(5~12V)
- soldering iron and accessories
- screw-driver
In the photo below, you can also find major parts that you need to prepare.

How to assemble
1. Open mouse cover
먼저 무선 마우스를 분해합니다. 대개 아래 사진과 비슷한 모양으로 되어 있습니다. 1.5V 건전지 삽입하는 부분을 떼어내고 여기에 부품들을 탑재하면 되겠습니다. 그리고 빨간색, 검은색 라인으로 +, – 전원을 공급해주면 됩니다. DIY 하실 마우스 상태를 보고 부품이 들어갈 공간을 적당히 확보하시면 되겠습니다.
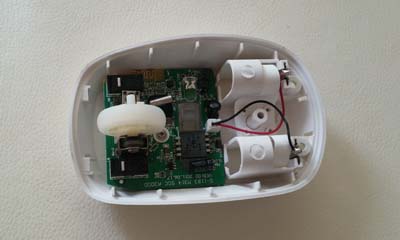
You can see the circuit like picture below when you open mouse cover. Remove the AAA battery space and we’re going to locate parts in it. The red and black line is for the power source.

2. Connect each part
I used LiPo charger module below. It has connection holes for battery, power input and power output (for mouse in this project).

- +, – holes in left side is for the external power source(5V). Connect both to inductive charging receiver.
- B+, B- holes in right side is for the LiPo battery +, -.
- OUT+, OUT- holes in right side is for the mouse. The red and black lines in your mouse should be connected to each of these.

3. Solder parts and test
I’ve soldered parts like picture below. To turn it on/off, I added a button at LiPo battery power line.

And I tested if wireless charging parts works well or not. Below picture is inductive charging transmitter. I connected this to power supply with 12V setting.

When transmitter and receiver’s coils are getting close, LiPo charger module turns red LED on. You can see the blue LED when battery is full.

At this time I found that this white mouse is out of order. So I changed the mouse with another one. At below steps you can see the black one.
4. Locate the parts in mouse
I made space for the wireless charging parts by removing the AAA battery area. To be more effective in wireless charging, locate the receiver’s coil at bottom.

And check again if wireless charging is working.

Close the cover if there is no problem.

5. Make parking pad
Hide inductive charging transmitter under the mouse pad or anything else.

Now you are free from battery!!

This article is written with wireless charging mouse. 🙂
See also:


